Exporting, Emailing, and Printing images from OptosAdvance
Images can be exported from OptosAdvance in JPG, PDF, or DICOM format. A JPG is a widely used, compressed image format for containing digital images and can be opened with any picture viewer.
- From the Patient Study Directory click on the Study to open for viewing. Make adjustments and layout changes desired before exporting
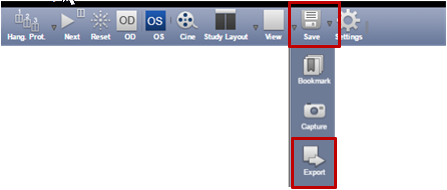
- Click Save on the toolbar and select Export

- Select your Save option in the drop-down in the upper left-hand corner:
- Viewport (only one of the windows)
- Display (whatever is on the screen)
- Current Image (whatever image is clicked on)
- Current Series (All images of one type)
- Current Study (All images)
- Key Images
- Change the Resolution according to the images final use 100%, 200%, 300%, 400%. Note: Be aware of the images' final use. Do not to create an overly large image without reason.
- Choose Titles option:
- All
- Minimal
- Light
- None
Note: A timed sequence will need ‘All’. This will keep/remove the information (name of patient, ID, DOB etc.) from the image(s) depending on the choice selected.
- At the bottom right of your screen, select Download
- Your JPG image will download to your Downloads folder by default
- If you need your images for a printed piece or for a large presentation we recommend selecting a 400% resolution.
To Download an Image as a PDF
- From the Patient Directory, click on the study to open for viewing and make any adjustments desired before exporting
- Click on Print Menu on the toolbar

- At this screen you can Save as the following
- Viewport (only one of the windows)
- Display (whatever is on the screen)
- Current Image (whatever image is clicked on)
- Current Series (All images of one type)
- Current Study (All images)
- Key Images
- Change the Resolution according to the images final use 100%, 200%, 300%, 400%. Note: Be aware of the images' final use. Do not to create an overly large image without reason.
- Leave Template set to Custom
- Choose Titles option:
- All
- Minimal
- Light
- None
Note: A timed sequence will need ‘All’. This will keep/remove the information (name of patient, ID, DOB etc.) from the image(s) depending on the choice selected.
- Click Preview to PDF at the bottom right, which will save to your Downloads folder by default

- If your system does not have this option, Click Print and change destination to Save as PDF and click Save, which will save to your Downloads folder by default
To Download an Image/Series/Study in DICOM Format
DICOM is the international standard related to the exchange, storage and communication for medical images. It contains a rich set of metadata that provides information about the image data such as the size, dimensions, bit depth, modality used to create the data, and equipment settings used to capture the image.
- Right-click on an image and choose Download Study
Note: This will download the full study. If you want to download only one image or series, review steps in From the Patient Study
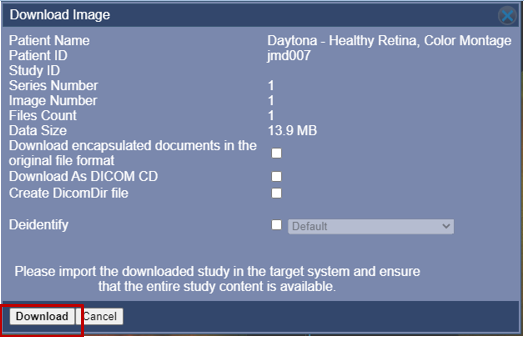
- To remove patient details from the Study/Series/Image, select the Advanced hyperlink and select Deidentify
- Click on Download, which will save to your Downloads folder by default
 Note: If pop-up blockers are on, it will prevent the download from happening. Turn off the popup blocker to proceed with your download. To view DICOM files, a DICOM view is required. MicroDicom is a free viewer and can be downloaded and used to view and save images.
Additional Help
If you are looking for further support or have additional inquiries, we encourage you to visit our Contact Us page. Our dedicated support team is readily available to assist you with any questions or concerns you may have.